
How to Edit a Podcast: Step-by-Step Guide
I'm Rajan Soni, founder of Komet Media. Every week I work with B2B teams turning raw recordings into content that builds pipelines. Before that work begins, the audio has to be clean, structured, and broadcast-ready. If you're figuring out how to edit a podcast for the first time, this guide gives you a complete, practical workflow you can follow right now.
TL;DR
- Pick a DAW that fits your budget and skill level before touching your raw audio file.
- Work through editing in sequence: clean, cut, mix, master, then export.
- Target -16 LUFS integrated loudness for consistent playback across every platform.
- Expect 2x to 4x your episode length in editing time until your workflow is tight.
What Software Do You Need to Edit a Podcast?
Your choice of DAW (Digital Audio Workstation) shapes your entire workflow. Here's how the main tools stack up:
The best free podcast editing software options are Audacity and GarageBand. Hindenburg Journalist is purpose-built for spoken-word audio with automatic leveling. Descript leads for speed and versatility through text-based editing, AI tools, and combined audio-video support starting at $16 monthly. Adobe Audition offers professional-grade audio editing within Adobe Creative Cloud for advanced users.
For Mac users specifically, GarageBand is Apple's free digital audio workstation included on every Mac, iPhone, and iPad, providing multitrack recording, an intuitive interface, and a library of built-in loops and sound effects.
One caveat: loudness normalization is not available natively in GarageBand, which means exported audio files may not meet the volume levels expected by distribution platforms without additional processing. For anything more serious, Audacity is the stronger free choice. Audacity's built-in noise reduction is the best among free editors for consistent background noise such as hum, hiss, and fan noise.
For more complex noise, Descript's Studio Sound feature uses AI and handles room echo and reverb better than traditional tools.
Podcast Editing Step by Step: The Full Workflow
This is the sequence I follow on every production at Komet Media's podcast editing service. Use it as your master checklist.
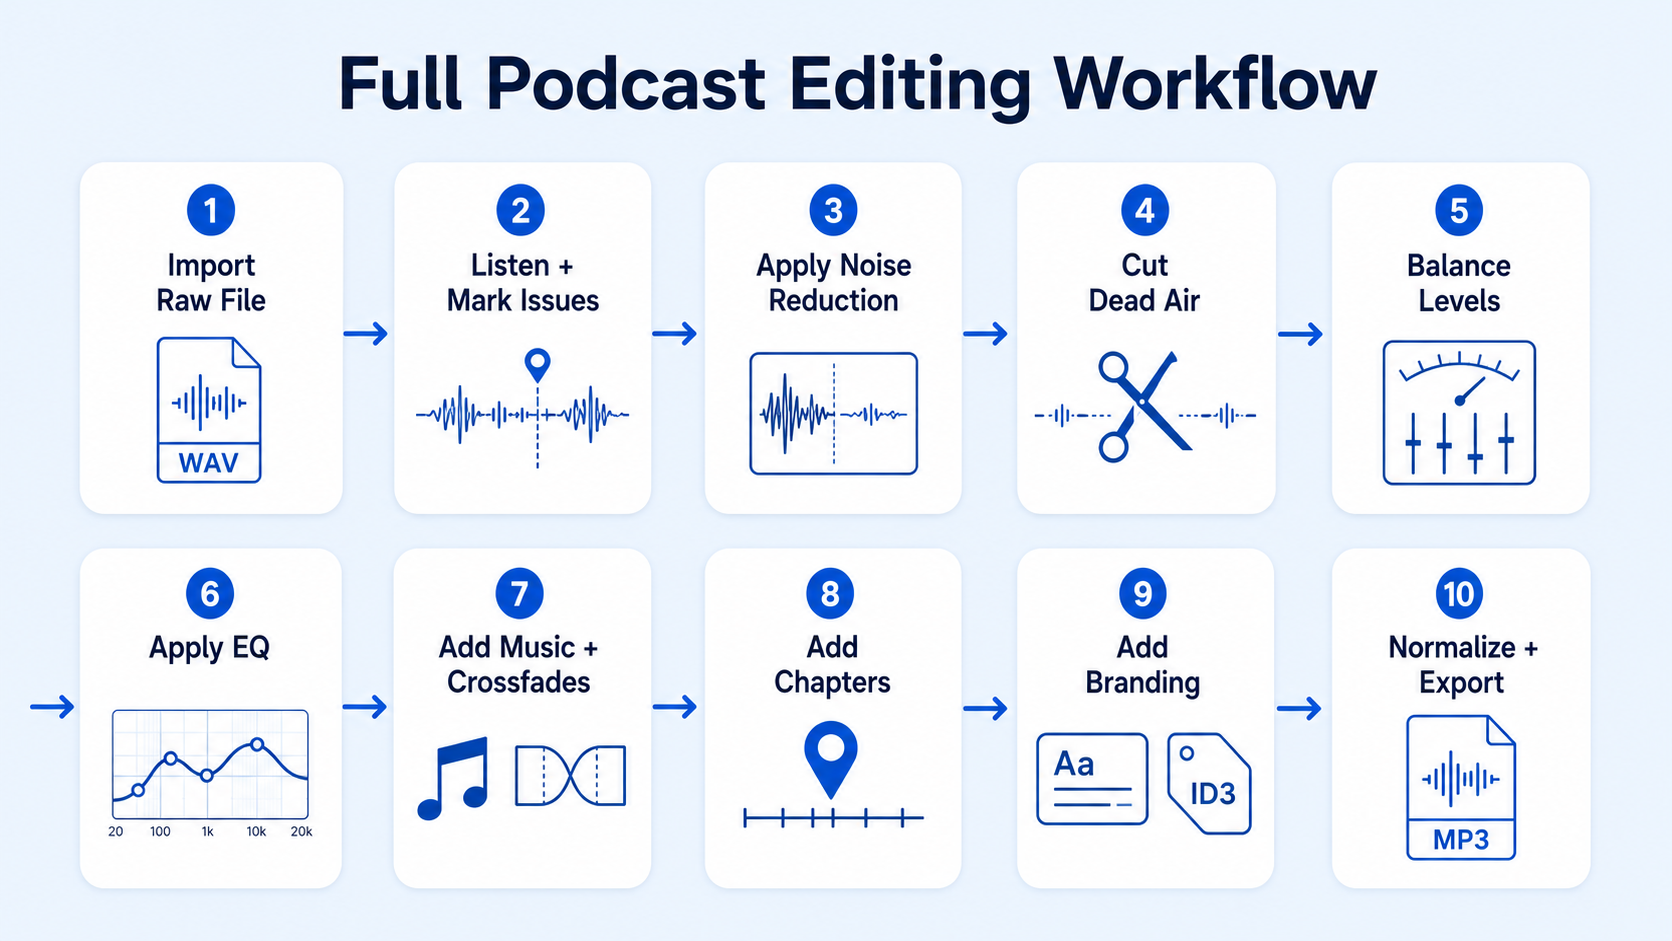
- Import your raw file: Open your DAW and import the recorded audio. Set up separate tracks for each speaker in a multitrack editing session so you can control levels independently.
- Listen through once: Before touching anything, do a full pass on the audio waveform. Mark timestamps for problem areas, noise spikes, long silences, and sections that need cutting.
- Apply noise reduction: Run noise reduction on any consistent background hum or hiss. Sample a short section of room tone (silence between speech) as your noise profile, then apply it globally. Keep the reduction conservative to avoid hollow-sounding speech.
- Cut dead air and mistakes: Remove filler words, long pauses, false starts, off-topic tangents, and crosstalk. This is where you tighten the episode's pacing.
- Balance levels: Use dynamic range compression to even out volume differences between speakers or between quiet and loud moments. A compressor with a ratio of 3:1 to 4:1 works well for speech.
- Apply EQ (equalisation): Roll off low-end rumble below 80 Hz with a high-pass filter. Boost presence in the 2–5 kHz range for clarity. Apply de-essing to tame harsh sibilance on "s" sounds.
- Add music and crossfades: Drop in your intro/outro music and apply crossfades at all edit points to prevent clicks and pops.
- Add chapter markers: Insert chapter markers for listener navigation and RSS feed compatibility.
- Add subtitles and branding: Incorporate your show's intro/outro branding, motion graphics, or video subtitles if you are publishing to platforms like YouTube.
- Loudness normalisation and export: Normalize to the industry standard and export. Tag your file with accurate ID3 tags (title, episode number, show name, date) before upload.
How to Remove Background Noise From a Podcast Recording
Background noise is the issue I hear most from founders who've recorded a podcast without professional support. The fix has two parts: prevention first, software second. Background noise is far easier to prevent than to remove. A clean recording needs almost no processing, while a noisy one always sounds processed after you fight it.
Before your session, turn off fans, air conditioning, fridges, and noisy computers; close windows; and record in the most soft-furnished room you have. Record short "room tone" clips, several seconds of silence in your environment, which can be used during editing to smooth transitions or patch over minor edits.
When noise does slip through, here is the post-production approach:
- In Audacity: Select a section of pure room tone, go to Effect > Noise Reduction, click "Get Noise Profile," then apply the effect to the full track. Keep the reduction slider conservative.
- In Adobe Audition: Go to Effects, head to Noise Reduction/Restoration, choose Noise Reduction (process), sample a segment that only has the unwanted noise, and click Capture Noise Print.
- AI tools: Adobe Podcast Enhance is free and requires no software install. Upload your audio file to podcast.adobe.com/enhance and receive a noise-cleaned version back in minutes. The AI separates voice from background noise with very few artifacts.
- Manual cuts: Manually edit out loud transient noises like coughs, chair squeaks, or barking dogs. Zoom in on the audio waveform to make precise cuts.
Warning: Aggressive noise reduction removes background noise but can make voices sound hollow or metallic. Use only as much reduction as you need to fix the problem.
How to Edit a Podcast in Audacity: Beginners Start Here
Audacity is where most podcasters learn how to edit a podcast for the first time. Audacity is the best free podcast editing software for beginners. While it doesn't have many advanced features, it has all the essential tools a new podcaster needs to edit audio.
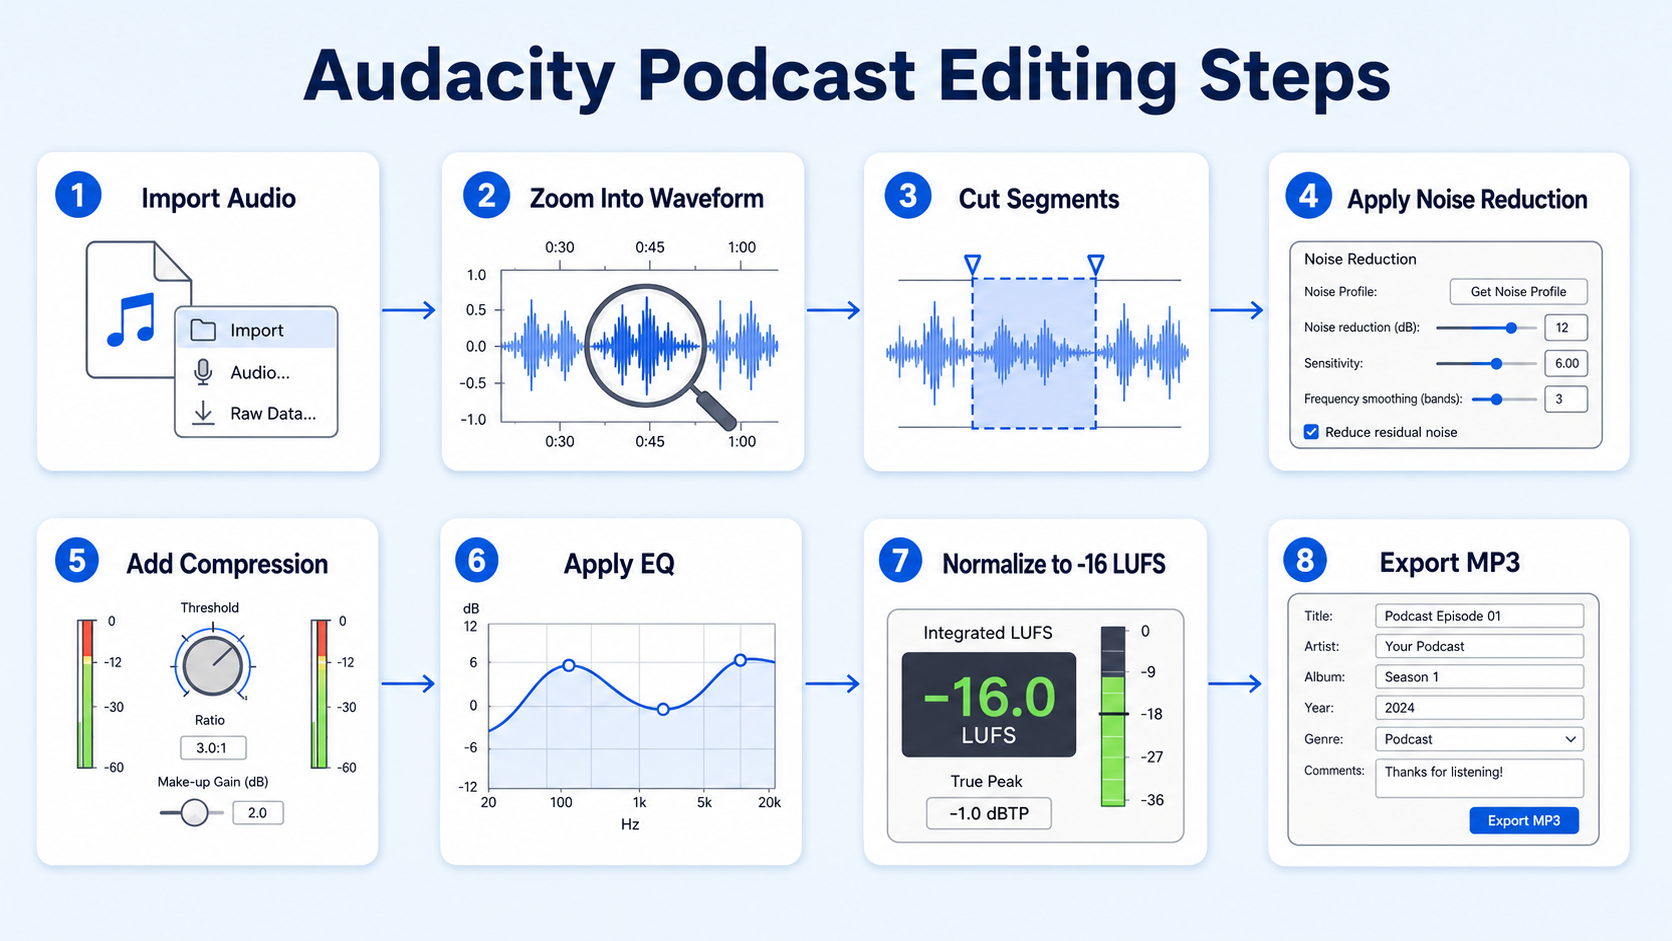
Here is a step-by-step Audacity workflow:
- Import your file: Go to File > Import > Audio. Your recording appears as an audio waveform on the track.
- Zoom in: Use Ctrl+scroll (or Cmd+scroll on Mac) to zoom in on sections you want to edit precisely.
- Cut segments: Highlight a region with the Selection Tool, then press Delete. Use Ctrl+Z to undo mistakes.
- Apply noise reduction: Go to Effect > Noise Reduction. Select a quiet section first, click "Get Noise Profile," select all audio, then apply.
- Add compression: Go to Effect > Compressor. Set threshold around -18 dB and ratio around 3:1. This handles dynamic range compression for speech.
- Apply EQ: Go to Effect > Filter Curve EQ. Add a high-pass filter at 80 Hz to remove rumble.
- Apply crossfades: At each edit point, select the join and go to Effect > Crossfade Clips to smooth transitions.
- Loudness normalisation: Go to Effect > Loudness Normalization. Set target to -16 LUFS.
- Export: Go to File > Export > Export as MP3. Fill in your ID3 tags before saving.
Choose Audacity if you want the most capable free tool available, don't mind learning a less polished interface, and value flexibility over simplicity. If you're on Mac and want a smoother start, GarageBand offers a polished interface, and Mac users benefit from its gentler onboarding.
How Long Does It Take to Edit a Podcast Episode?
Editing time is the cost most new podcasters underestimate. As a general rule of thumb, many podcast editors estimate editing will take 2x to 4x the episode length. If you're creating a polished narrative, documentary-style episode, or complex multi-guest interview, expect editing to take significantly longer. These types of episodes can take 3 to 5 times the episode's length, meaning a one-hour podcast might require up to 8 hours of editing.
For context across formats:
Podcast editing time varies from 30 minutes to 15 hours per episode depending on content type, editor skill level, and workflow approach. Solo commentary podcasts require 3–10 hours manual editing or 1–2 hours with automation. Interview podcasts require 4–14 hours manually or 1.3–3 hours with automation.
Good-quality audio saves hours in post-production. Recordings with clear speech, minimal background noise, and proper mic placement drastically reduce the need for heavy edits. If this time investment is pulling you away from higher-value work, our podcast production service takes the full workflow off your plate.
Mastering and Export: Loudness Normalisation, ID3 Tags, and Distribution
The final stage of knowing how to edit a podcast is getting the file distribution-ready. This is where mixing becomes mastering.
Loudness normalisation is the most important export setting. For podcasting, the accepted standard is -16 LUFS integrated. Platforms like Spotify, Apple Podcasts, and YouTube normalize audio to specific targets. If your episode is too quiet, the platform will turn it up, potentially introducing distortion. If it's too loud, it will be turned down. Mastering to -16 LUFS ensures consistent playback everywhere. Ensure no inter-sample peaks exceed -1 dBTP for safe streaming delivery.
ID3 tags carry your episode metadata inside the audio file itself. Fill in every field: episode title, season and episode number, show name, publication date, and a description. Podcast directories including Buzzsprout and Anchor FM (now Spotify for Podcasters) pull these tags automatically when you upload.
Export format: Export as MP3 at 128 kbps for audio-only episodes or 192 kbps for higher production quality. WAV is the right format for archiving your session.
Distribution checklist before upload:
- Loudness confirmed at -16 LUFS integrated
- True peak below -1 dBTP
- ID3 tags complete
- Show notes and transcript prepared (see our podcast transcription service and podcast show notes service)
- Episode artwork at correct dimensions
- RSS feed validated
Once uploaded to your host (Buzzsprout, Anchor FM, or any major platform), your RSS feed syndicates the episode to every directory automatically.
Conclusion
Here is what the complete workflow comes down to:
- Choose the right tool first: Audacity or GarageBand for free, Descript or Adobe Audition when you're ready to invest.
- Work in sequence: clean the audio, cut aggressively, compress and EQ for clarity, normalize to -16 LUFS, then export with full ID3 tags.
- Prevent noise at the source: a clean recording cuts post-production time significantly.
- Budget your time realistically: plan for 2x to 4x your episode length in editing time, especially early on.
If you'd rather hand this process off, Komet Media's podcast editing team handles the full chain from raw file to publish-ready episode.
Frequently Asked Questions
Q1: What is the difference between podcast editing and mixing?
Editing is the process of cutting content: removing mistakes, filler words, dead air, and off-topic segments. Mixing is the process of balancing and processing audio across tracks: adjusting levels, applying EQ, compression, de-essing, and adding music. Both happen before the final mastering and export stage.
Q2: What should I cut out when editing a podcast?
Cut filler words (um, uh, like), long silences over 1.5 seconds, false starts, repeated sentences, off-topic tangents, technical interruptions, and any crosstalk where two speakers overlap without useful content. Leave in natural pauses between thoughts; over-editing makes speech sound robotic.
Q3: How do I edit a podcast on a Mac without expensive software?
GarageBand is Apple's free digital audio workstation included on every Mac, so Mac owners incur no extra cost to use it. It handles multitrack editing, EQ, compression, and music integration. For loudness normalisation, export your session and run the file through Adobe Podcast Enhance, which is also free.
Q4: What LUFS should I target when exporting my podcast?
Aim for a -16 LUFS podcast loudness standard and a -1 dB peak to avoid distortion, keep your podcast volume consistent, and your listeners comfortable. YouTube targets -14 LUFS, so if you repurpose episodes there, keep both targets in mind.
Q5: Can I use Descript to edit a podcast if I have no audio editing experience?
Yes. Descript lets you edit audio by editing a text transcript, making it the most beginner-friendly option for people without a DAW background. You delete words in the transcript and the corresponding audio is removed automatically. It also handles noise reduction and loudness normalisation on export.
Q6: Should I hire a podcast editor or do it myself?
DIY podcast editing usually takes longer due to the learning curve involved with audio tools and storytelling structure. In contrast, a professional podcast editor brings speed, efficiency, and consistency, often completing edits in half the time. If your time is worth more than the editing cost, outsourcing is the smarter call. Explore Komet Media's podcast marketing and editing services for a full-service option.

