
Setting Up Your Source Footage for Faster Video Editing: Step-by-Step Guide
Most editors don't lose time in the edit itself. They lose it before a single cut is made, hunting for clips, fighting laggy playback, relinking broken proxies. Setting up your source footage for faster video editing removes that friction before it starts. This guide gives you the exact workflow: folder structure, naming conventions, proxy setup, codec decisions, storage configuration, metadata tagging, and sequence settings, all designed to make your timeline run as fast as possible.
TL;DR
- Build a consistent folder structure and mirror it inside your NLE before importing anything.
- Create proxies on ingest for all 4K+ or heavily compressed footage.
- Store active media on SSDs and configure scratch disks separately from your boot drive.
- Match sequence settings to your source frame rate and codec to eliminate unnecessary conversions.
What Does Source Footage Organization Mean in Video Editing?
Source footage organization is the practice of structuring, naming, and categorizing your raw media files before your NLE ever touches them. It is not an optional housekeeping step. Poor video file organization wastes time, causes confusion, and turns projects into a frustrating cup game of "where is it?" that you will never win.
At Komet Media, when we take on a client's webinar recordings, podcast sessions, or product demos, the first thing we do is organize the source files. Everything downstream, the proxy workflow, the bin structure, the color grading pipeline, depends on clean source organization. Skip it and you will spend two hours relinking clips instead of making actual edits.
Here is what source footage organization covers:
- A project folder hierarchy on your hard drive that is consistent across every project.
- Descriptive, date-prefixed file names that survive across team members and months.
- Bins inside your NLE that mirror the folder structure on disk.
- Metadata tags applied to clips at ingest, not after you are already mid-edit.
By creating structured file systems with numbered folders, consistent naming conventions, and smart bin organization, you transform chaotic workflows into streamlined creative processes, the difference between spending 30 minutes searching for a clip versus finding it in 30 seconds. Setting up your source footage for faster video editing is not just about tidiness. It is how you protect every hour you invest in an edit from being eroded by avoidable file management chaos.
What Folder Structure Should You Use for Video Editing Projects?
Video editing efficiency is largely determined by folder structure. A repeatable template you apply to every project is worth far more than a perfect structure you invent once and never use again. Here is the core folder structure that works across Adobe Premiere Pro, Final Cut Pro, and DaVinci Resolve:
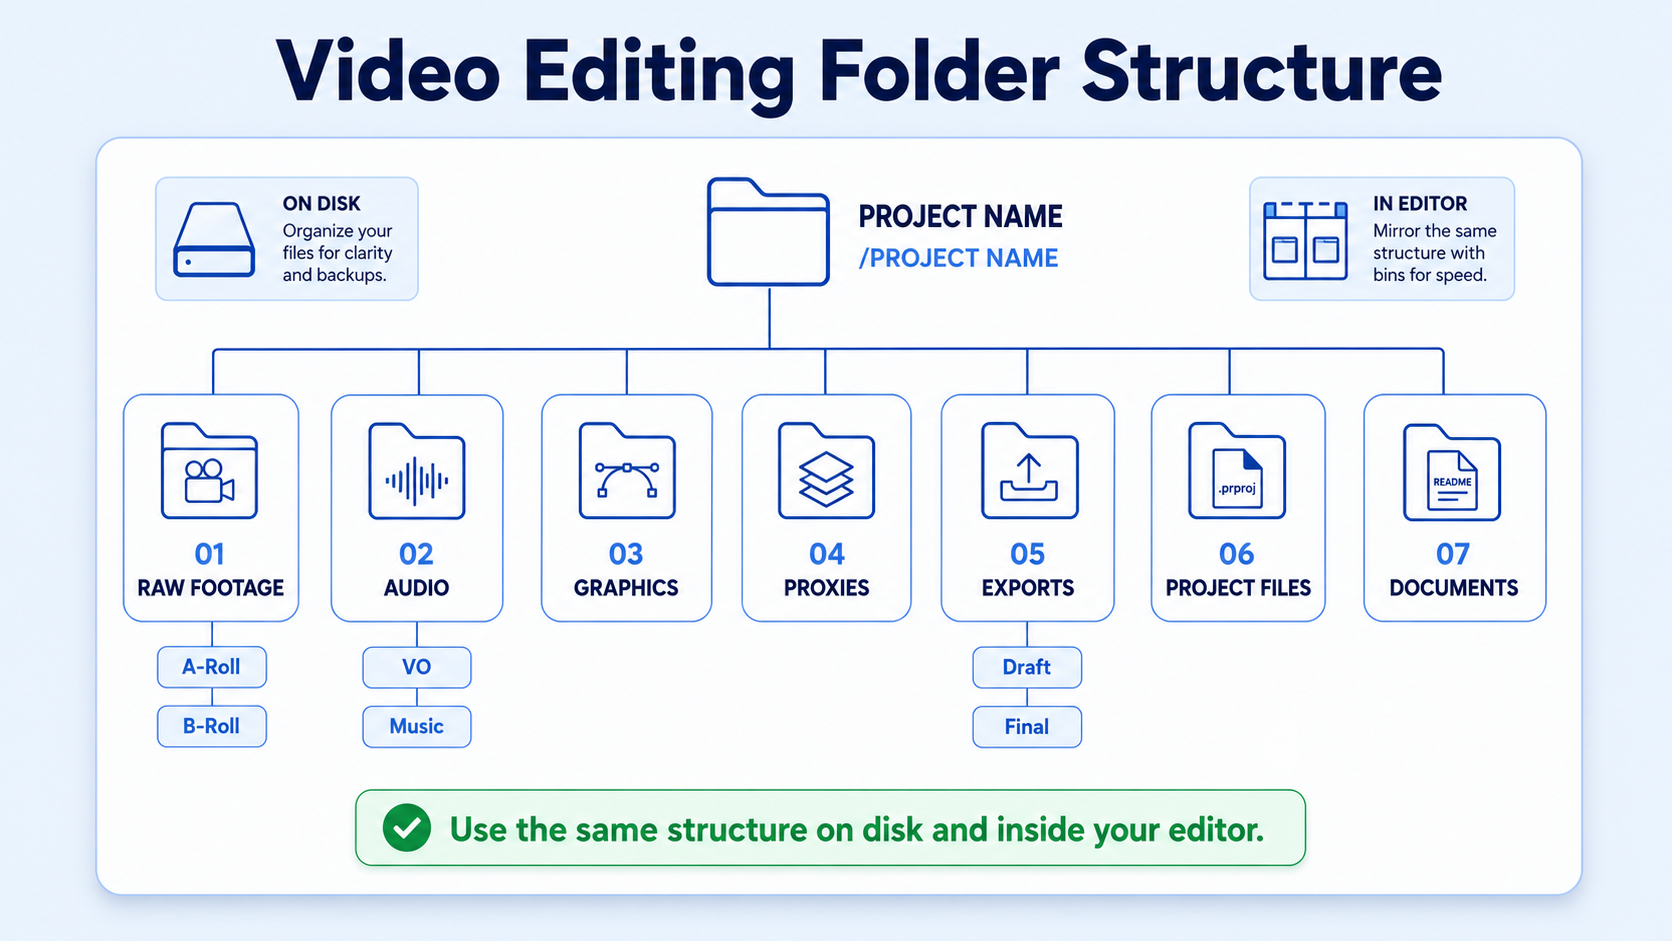
Two rules make this structure work in practice:
- Date-prefix everything: Sorting by name automatically becomes sorting by chronology. Good file naming looks like 2026-07-15<span style="font-style:italic;">ClientA</span>Interview_01.mp4. Many cameras default to generic names like CLIP001, CLIP002, and if someone formats their memory card, those names start from zero again, meaning you will have multiple files with identical names on the same project.
- Mirror the structure inside your NLE: Your computer folder structure and your Premiere or DaVinci Resolve bin structure should match, same folder names, same hierarchy, same logic, because a mirrored structure saves hours of troubleshooting and keeps projects fast and clean.
For teams managing multiple clients, archive completed projects by year, keeping the current year's projects accessible and moving older projects to archive storage. Always start your projects with two root folders: Projects (a folder where active and completed projects live, akin to a job site where all the heavy lifting happens) and Library (a collection of reusable assets like stock music or templates you will need across multiple projects).
Should You Transcode Footage Before Starting an Edit?
This is one of the most searched questions in post-production and one of the most misunderstood. The short answer: transcoding is about editing performance, not quality. Transcoding your footage before you edit will never increase the quality of the output. There are some extra operations you could do in the transcode process that could increase image quality in some cases, but a new codec by itself will never increase the quality of your image.
What transcoding does is reduce CPU load during playback. Intra-frame compression in intermediate codecs like DNxHD reduces CPU load during playback and editing compared to delivery codecs like H.264 or H.265, which require intensive inter-frame decoding on every frame. Here is when transcoding makes sense:
Many cameras now record directly in ProRes or DNxHR, which means you can skip the transcoding step entirely if your camera already outputs in the codec your NLE prefers. If you are delivering to web or streaming platforms, the final export will be H.264 or HEVC regardless, so edit in an intermediate codec for quality and performance, then compress to a delivery format at the end.
For the B2B teams I work with at Komet Media, repurposing webinars and founder video content, proxy workflows almost always beat full transcoding. They are faster to set up, cheaper in storage, and the final export quality is identical.
What Is the Fastest Workflow for Setting Up Raw Footage with Proxies?
Proxy editing is a technique used in video production to improve the efficiency and speed of the editing process. It involves creating lower-resolution copies of high-resolution video files, known as proxy files, which are used for editing instead of the original media. Proxies are low-resolution video files that work in tandem with your original high-resolution files, reducing file size by up to 80%, and work on any editing software like Premiere Pro, Resolve, or Final Cut.
Here is the step-by-step proxy setup process in Adobe Premiere Pro:
- Organize your folder structure first: Before you make proxies, clean up your media structure and create a project folder with clear subfolders, because this prevents one of the most common proxy problems: broken links caused by moving files around mid-project.
- Import footage into your project.
- Select all clips in the Project panel, right-click, and choose Proxy > Create Proxies.
- Select a proxy preset: H.264 Low Resolution is fine for rough cuts; ProRes 422 Proxy gives you more flexibility during color work.
- Set the destination to your 04_PROXIES folder, never let proxies scatter into the same directory as originals.
- Enable proxy toggle in your program monitor using the wrench icon to switch between proxy and full-res.
- Before export, toggle proxies off so Premiere relinks to original media.
In DaVinci Resolve, the equivalent lives under Playback > Proxy Mode or via the Optimized Media system in the Media Pool. The DaVinci Resolve Render Cache is nothing but the caching or rendering of your clips with all the effects baked in so that playback is smooth and in real-time without dropped frames.
As video quality standards continue rising in 2026, mastering proxy workflows has become an essential skill for every serious editor, so that instead of fighting with laggy timelines and crashing software, you can focus entirely on storytelling, creativity, and producing professional-quality content faster than ever before.
How to Configure Storage Architecture and Scratch Disks for Speed
Storage is where most editors leave performance on the table. No amount of proxy or codec optimization compensates for source footage sitting on an old spinning drive. Solid State Drives (SSDs) offer significant advantages such as faster speeds, enhancing editing processes like scrubbing through footage and loading previews. Hard Disk Drives (HDDs) are slower, potentially causing lags and stutters during editing, especially with high-resolution footage.
The right storage architecture for video editing in 2026:
Assigning your external SSD as a scratch disk in Adobe Premiere Pro speeds up preview rendering, media cache access, and export times, just make sure it's a fast NVMe or USB 3.2 drive. The scratch disk stores video previews, backups, media cache files, and audio previews. To configure it, go to File > Project Settings > Scratch Disks. Keeping these separate prevents bottlenecks and improves responsiveness.
For teams with collaborative workflows, network-attached storage (NAS) systems are perfect for collaborative work, allowing multiple users to access and work on projects stored on the same network. They offer high-capacity storage and advanced features like RAID configurations and data redundancy, streamlining workflows for remote teams.
One practical note on scratch disks in 2026: the necessity of a dedicated scratch disk is a nuanced subject that largely depends on the specific intensity of your workflow and the architecture of modern storage. With the prevalence of PCIe Gen 5 and Gen 6 NVMe SSDs, transfer speeds have reached heights where traditional bottlenecks of reading and writing simultaneously are significantly mitigated. On a high-end machine with a fast single NVMe, a second drive for cache is still worth having, but it is no longer the absolute requirement it was five years ago.
How Do Professional Editors Use Metadata Tagging and Bin Organization?
Folder structure gets your files in the right place. Metadata and bin organization make those files findable in seconds once they are inside your NLE. Most editors ignore metadata completely. They dump 200 clips into a bin, scrub through them one by one, and call it a workflow. That works until it does not. Once you have 500 or 1,000 clips across multiple shoot days, metadata is the difference between finding your shot in two seconds and losing twenty minutes. Metadata turns your Media Pool from a pile of files into a searchable database.
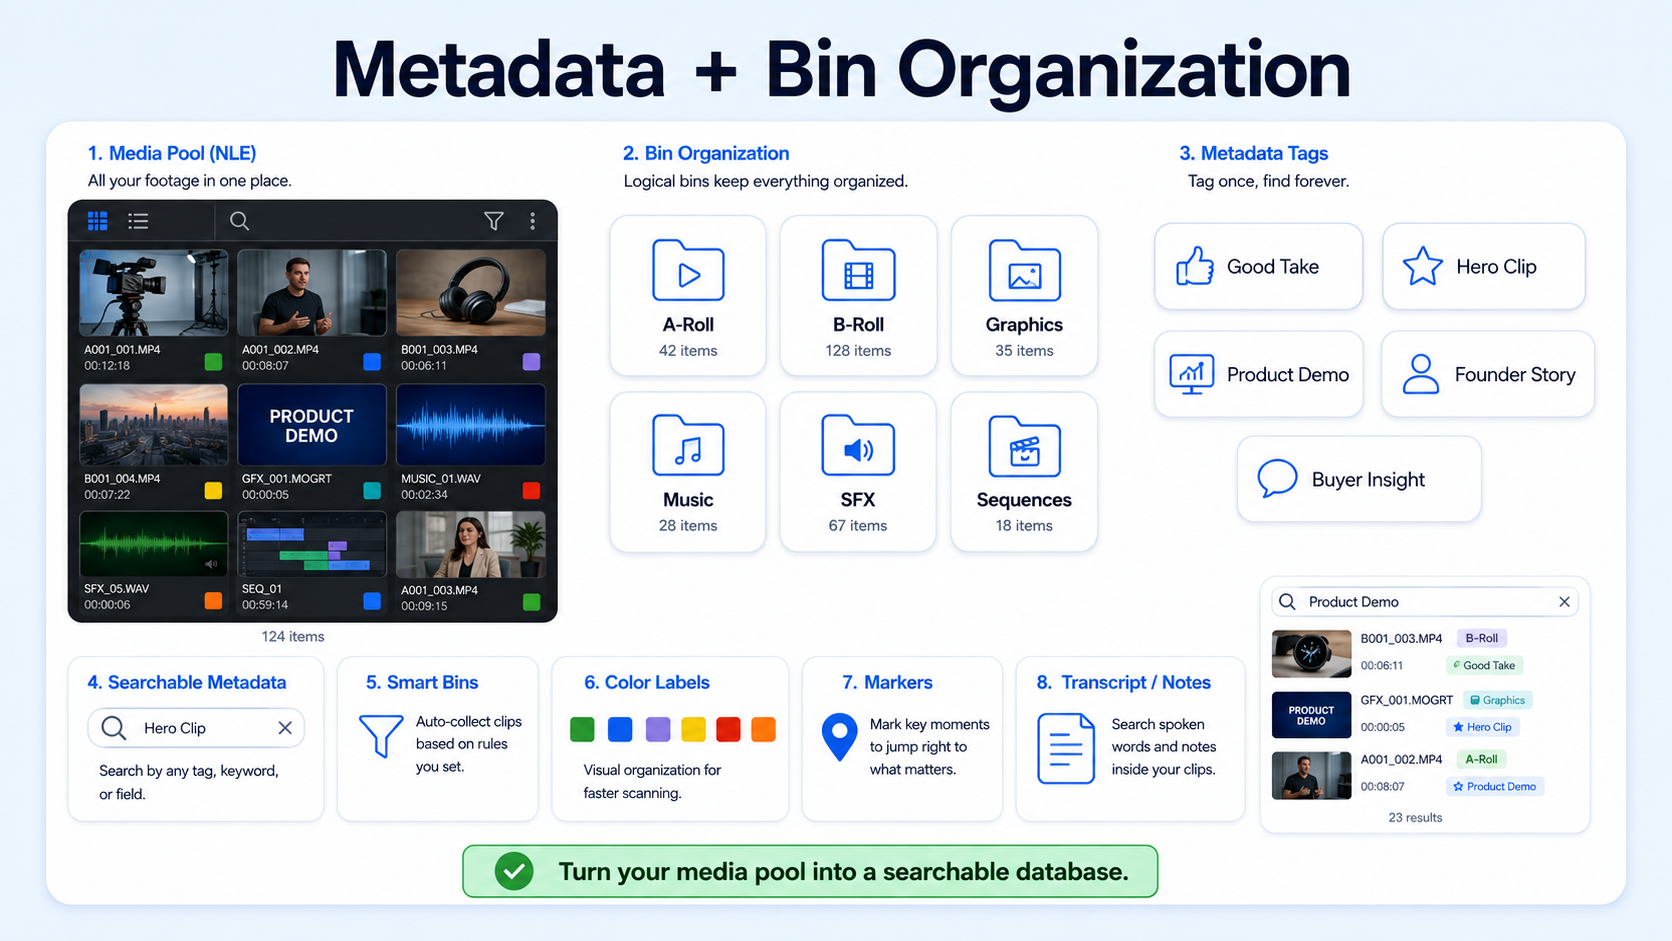
Here is how to approach metadata tagging at ingest across different NLEs:
Adobe Premiere Pro: Use the Metalogging workspace (Window > Workspace > Metalogging) immediately after import. If you work with a lot of media assets or work with a group of other editors, metadata can help you immensely, by adding information to video and audio assets, you can quickly and easily find the information at a later time with a simple keyword search.
DaVinci Resolve: In the Media Pool, use the Metadata Editor panel to fill in keywords, scene, shot type, and take number. Every clip in your DaVinci Resolve Media Pool carries metadata, some of it is baked in by the camera (resolution, codec, frame rate), and the rest is up to you. Smart Bins in Resolve auto-populate based on metadata fields, meaning once you tag clips correctly at ingest, Resolve builds your bins for you automatically.
Bin organization best practices:
- Create bins for A-Roll, B-Roll, Graphics, Music, SFX, and Sequences, matching your folder structure on disk.
- Use a **Sequence bin with asterisks to force it to the top of your Project panel alphabetically.
- Color-label bins by shoot day or content type to make visual scanning faster.
- Add "Good Take" or "Hero Clip" markers during ingestion so selects are pre-identified before you build a rough cut.
For B2B teams repurposing podcast recordings, webinars, and long-form founder content, metadata tagging at ingest is the single highest-leverage practice you can build into your workflow. Tagging "key insight," "product demo," or "founder story" as clip comments at ingest means the short-form editor pulling clips days later finds the right moment in 10 seconds instead of scrubbing through 90 minutes.
How to Set Up Sequence Settings and Render Cache for Maximum Performance
Setting up your source footage for faster video editing does not end at ingest. Your sequence settings and render cache configuration determine whether your timeline plays at full speed or drops frames every three seconds.
Sequence settings: Match your sequence's resolution, frame rate, and color space to your source footage, or intentionally downscale the sequence for performance gains. A sequence set to 4K when you are editing 1080p proxies forces the NLE to upscale on every frame, wasting processing power with zero quality benefit during the rough cut phase.
The critical settings to lock in before your first cut:
- Frame rate: Match your camera's native frame rate exactly. Mixing 23.976 and 24fps on the same timeline causes subtle audio drift over long projects.
- Codec/sequence preset: In Premiere Pro, choose the preset that matches your camera (e.g., XAVC S 4K for Sony, HEVC for H.265 cameras). In Resolve, set Timeline Format under Project Settings > Master Settings.
- Color space: Set this before importing footage, not after. Changing it mid-project invalidates cached previews.
- Render cache format: Choose processor-friendly codecs like DNxHR, ProRes, or Uncompressed 10/16 bits for your render cache format. This is where the render cache helps you improve real-time performance on clips where optimized media with heavy effects added on top causes playback to stutter.
In DaVinci Resolve, set Render Cache to Smart mode (Playback > Render Cache > Smart). While render cache pre-renders sections with effects applied to your original footage, proxies are lower-resolution versions of your source footage, they work together, so you can use proxies for general editing and then use render cache to smooth out playback for specific sections with demanding effects or color grades applied to your higher-resolution media.
For short-form video production at 1080p or vertical 9:16, the sequence setup is simpler but frame rate matching is even more critical, a 30fps sequence with 29.97 source footage will create visible frame judder on social platforms with strict playback algorithms.
One final step: start strong by transcoding your raw footage to optimized codecs like ProRes or DNxHR or by creating lightweight proxies for smoother editing, especially with high-resolution media. Then set your render cache to auto-render on background tasks during every break. By the time you return to the timeline, the heavy sections are already cached and play back at full speed.
Conclusion
Setting up your source footage for faster video editing is a front-loaded investment that pays back every single session. Do the work once at ingestion and the entire edit runs faster.
- Build and commit to a consistent folder structure with date-prefixed file names across every project.
- Create proxies during ingestion, never mid-edit, and store them in a dedicated subfolder.
- Run active media on SSDs, configure scratch disks separately, and keep cold storage on HDDs or RAID.
- Match sequence settings to source frame rate and codec before your first cut, and set render cache to Smart mode.
If you want a video editing and content repurposing system built and managed for your team, get in touch with Komet Media.
Frequently Asked Questions
Q1: What is the best proxy codec for setting up source footage for faster video editing?
For most workflows, H.264 Low Resolution proxies work for rough cuts, while ProRes 422 Proxy or DNxHD 36 are better if you need to do light color work on the proxy. If you're working in a proxy workflow, a lightweight DNxHD 36 codec will suffice, as you'll reconnect to your high-quality source media later. Match the proxy frame rate to your source.
Q2: How do professional editors organize source files when handing off to another editor?
When you need to hand off your project to someone else, like an ad agency or production company, no one wants to see files scattered everywhere with no discernible structure, they need to see everything organized, which creates less work for them and means happier clients. Always include a _README document explaining the folder structure and naming conventions used.
Q3: Can I use both proxies and render cache at the same time?
Yes. You can use proxies for general editing and then use render cache to smooth out playback for specific sections with demanding effects or color grades applied to your higher-resolution media. They serve different purposes and complement each other on complex, effect-heavy timelines.
Q4: What happens if I move source footage files after I've already linked them in my NLE?
Moving files after linking breaks the project's media references, forcing a relinking session before you can edit. Before you make proxies, clean up your media structure and create your project folder with clear subfolders, this prevents one of the most common proxy problems: broken links caused by moving files mid-project. Lock your folder structure at the start and never move raw media.
Q5: Does transcoding footage before editing improve export quality?
No. Transcoding your footage before you edit will never increase the quality of the output. Transcoding to an intermediate codec like ProRes or DNxHD improves editing performance and timeline responsiveness, but the final output quality depends on the original camera files used at export, not the intermediate format used during the edit.
Q6: What is the minimum storage setup for setting up source footage for faster video editing on a laptop?
Use a fast NVMe SSD as your boot and application drive, and a second external SSD for active project media and proxies. Internal and external SSDs are game changers for video editing, they cut load times, boost rendering, and promote smooth playback of high-res footage, making them perfect to use as scratch disks where speed is critical. A third HDD for cold storage and backups rounds out a complete laptop editing setup.

